- HTTP
- Introduction & Client-Server Model
- HTTP Request and Response
- HTML Forms and Input Controls
- Client-side Restrictions
- HTML: The use of form elements
- HTML: HTML5 Validations
- JS: Javascript Validations
- Form Submission Approaches
- Traditional Form Submission
- Programmatic Form Submission
- AJAX Form Submission
HTTP and Client-side
Form Handling
IERG4210 Lecture 4
Dr. Adonis Fung
Information Engineering, CUHK
Paranoids, Yahoo!
IERG4210 Web Programming and Security, 2015 Spring.
Offered by Dept. of Information Engineering, The Chinese University of Hong Kong.
Copyright. Dr. Adonis Fung
Agenda
Introduction to HTTP
- Defintion: HTTP is a text-based application-layer protocol that defines how content is requested from a client application and served by a web server.
- Work on top of TCP/IP
- Latest standard is HTTP/1.1, defined in RFC2616. (HTTP/2 drafting)
- Specifications of HTTP Request and Response Headers
- Client-Server Model
- Popular servers: Apache, Nginx, Node.js, IIS, AppEngine, etc
- Popular clients/agents: Chrome, Firefox, IE, Safari, etc
- (Demo) Using telnet to make a simple request
Client-Server Model
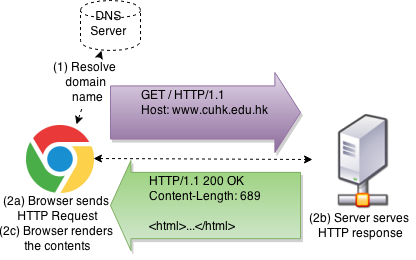
Surfing the Web using Telnet
$ telnet www.cuhk.edu.hk 80
Trying 137.189.11.73...
Connected to www.cuhk.edu.hk.
Escape character is '^]'.
GET / HTTP/1.1
Host: www.cuhk.edu.hk

HTTP/1.1 200 OK
Date: Mon, 26 Jan 2015 17:00:28 GMT
Server: Apache/2.0.52 (Unix) DAV/2 mod_ssl/2.0.52 OpenSSL/0.9.7d PHP/5.0.2
Content-Location: index.html.en
Vary: negotiate,accept-language
TCN: choice
Last-Modified: Mon, 14 Dec 2009 09:42:15 GMT
ETag: "10c43b-19d-16a9cbc0;c0440-10a-a080d780"
Accept-Ranges: bytes
Content-Length: 413
Content-Type: text/html
Content-Language: en

<HTML>
<HEAD>
<TITLE>The Chinese University of Hong Kong</TITLE>
<META HTTP-EQUIV="CACHE-CONTROL" CONTENT="NO-CACHE">
<META HTTP-EQUIV="Pragma" CONTENT="no-cache">
<META HTTP-EQUIV="Expires" CONTENT="-1">
<META HTTP-EQUIV="Refresh" CONTENT="0; URL=/english/index.html">
</HEAD>
<BODY>
Being directed to The Chinese University of Hong Kong home page according to your browser language preference.
</BODY>
</HTML>
Typical HTTP Requests
- GET request:
GET /~ierg4210/lectures/incl/process.php?q=abc HTTP/1.1
Host: course.ie.cuhk.edu.hk
- POST request:
POST /~ierg4210/lectures/incl/process.php?q=abc HTTP/1.1
Host: course.ie.cuhk.edu.hk
Content-Length: 102
Content-Type: application/x-www-form-urlencoded

name=Adon&gender=M&email=phfung%40ie.cuhk.edu.hk&address=SHB%2C+CUHK%2C+NT®ion=NT&action=updateInfo
- Specifications:
- Request Version: HTTP/1.0, HTTP/1.1
- Request Method: GET, POST, PUT, HEAD, DELETE, CONNECT, etc...
- Request Parameters: query string v.s. body
- Request Headers: specifying hostname, content-length and content-type
Typical HTTP Response
-
HTTP/1.1 200 OK
Date: Mon, 26 Jan 2015 17:00:28 GMT
Content-Length: 413
Content-Type: text/html

<HTML>...</HTML>
- Specifications:
- Response Version: HTTP/1.0, HTTP/1.1
- Response Status: 1xx for Informational, 2xx for Successful, 3xx for Redirection, 4xx for Client Error, and 5xx for Server Error
- Response Headers: content-length, content-type, and many more for authentication, cookies, security, caching, redirection, etc...
- Response Body: the content
HTML Forms
- The most prevalent approach to solicit information from users
- Technically, a <form> tag that comprises different form controls including <input>, <textarea>, and <select>
- A typical example that asks for user's information:
<fieldset>
  <legend>Personal Information</legend>
  <form method="POST" action="https://course.ie.cuhk.edu.hk/~ierg4210/lectures/incl/process.php?q=abc"><ul>
    <li>
      <label>Name*</label>
      <div><input type="text" name="name" required /></div>
    </li>
    <li>
      <label>Gender*</label>
      <div><input required type="radio" name="gender" value="M" /> M <input type="radio" name="gender" value="F" /> F</div>
    </li>
    <li>
      <label>Email*</label>
      <div><input type="email" name="email" required placeholder="john@example.com" /></div>
    </li>
    <li>
      <label>Address*</label>
      <div><textarea name="address" required></textarea></div>
    </li>
    <li>
      <label>Region*</label>
      <div><select required name="region"><option/><option value="HK">HK</option><option value="KL">KL</option><option value="NT">NT</option></select></div>
    </li>
  </ul>
  <input type="hidden" name="action" value="updateInfo" />
  <input type="submit" value="Send" /><span> * denotes a required field.</span>
  </form>
</fieldset>
<form> Attributes
<form method="POST" action="/~ierg4210/lectures/incl/process.php?q=abc">
<!-- include some input controls here -->
</form>
method="POST"ormethod="GET"(default: GET)- POST is mainly used to make changes on server data, while
GET is used to retrieve data only
- POST is mainly used to make changes on server data, while
action="/~ierg4210/lectures/incl/process.php?q=abc"(default: the current URL)- the value takes a URL that will accept the form request
onsubmit="return false"is optional- Often used when the form is submitted over AJAX, to be discussed in later slides
- Avoid it due to inline script restriction by CSP
enctype="multipart/form-data"is optional- When
<input type="file"/>is used for file upload
- When
Form Controls (1/4)
- A typical form control is defined as follows:
<!-- <label> is to focus on a field when clicked -->
<label for="field1">Field 1: </label>
<input type="text" name="param1" id="field1" />
- Most Common Controls:
- Text field
First Name: <input type="text" name="firstname" />
- Password field (MUST use POST method)
Password: <input type="password" name="name" value="abc" />
- Hidden Field
Hidden? <input type="hidden" name="action" value="updateData" />
- Text field
Form Controls (2/4)
- Controls that offer choices:
- Radio box
(limit to a single choice for a group of radios of the same name)
<input type="radio" name="sex" value="M" checked/> M
<input type="radio" name="sex" value="F" /> F
- Checkboxes
(multiple choices)
<input type="checkbox" name="item[]" value="A" checked /> A <input type="checkbox" name="item[]" value="B" /> B - Dropdown menu (single choice now; try adding a attribute
multiple)Which OS do you like: <select name="OS"> <option value="1">iOS</option> <option value="2" selected="true">Android</option> </select>
- Radio box
(limit to a single choice for a group of radios of the same name)
Form Controls (3/4)
- Even More Controls:
- Textarea (Multi-line text field)
Description:
<textarea name="desc">IERG4210</textarea>
- File Field
Photos: <input type="file" name="pics" />
- Submit Button
<input type="submit" value="Go" />
- Image Submit Button (Image Credit: HSBC)
<input type="image" src="incl/04-go.gif" />
- Textarea (Multi-line text field)
Form Controls (4/4)
- HTML 5 New Controls
- Email Field
<form>Email:* <input type="email" name="email" required /></form> - URL Field with optional use of styling by new CSS pseudo selectors
<style>:valid{border:1px solid #0F0} :invalid{border:1px solid #F00}</style> <form>URL: <input type="URL" name="url" /></form> - Search Field
<form><input type="search" name="q" placeholder="Search..." /></form> - Custom Pattern Field with regular expressions
<form>Amount: $<input type="text" name="amount" pattern="^[\d,.]+$" /></form>
- Email Field
- In a nutshell, HTML5 Forms introduced
- More specific-purpose textfields; Built-in support of client-side validations
- New CSS Pseudo Selectors:
:valid,:invalid,:requiredand:optional
Regular Expressions
- A language to recognize string patterns
-
Refer to a Cheatsheet for reference
- What you must know:
- ^ - start of string; $ - end of string (IMPORTANT to validations!)
- + - one or more times; ? - 0 or 1 times; * - 0 or more times
- Examples:
- Float (\d includes digits only):
^[\d\.]+$
- Alphanumeric (\w includes letters, digits, underscore):
^[\w\-, ]+$
- Email:
^[\w=+\-\/][\w=\'+\-\/\.]*@[\w\-]+(\.[\w\-]+)*(\.[\w]{2,6})$The regular expression for email address is readily available on Web.
IMPORTANT: Consult creditable websites for reusable patterns!!
- Float (\d includes digits only):
HTML5 Forms: Browser Support (1/1)
HTML5 Forms: Browser Support (2/2)
Client-side Restrictions
Client-side Restrictions
- To inform the users early on for input errors
- To create a more interactive and responsive UI experience
- Otherwise, input errors are prompted only after form submissions (round-trip delay)
- To imply a specific pattern that a user is expected to follow
- To help users enter/choose the valid data that we need
- IMPORTANT: They can be bypassed by Parameter Tampering Attacks!! Don't count on them for security!!
Reason: A user has full control of any client-side code downloaded to his browser using the lovely Firebug :)
- Hence, you need input validations implemented on BOTH
- server-side for security enforcement, and
- client-side for better user experience.
Reading: Extracted pages for FAITH
3 Approaches of Client-side Restrictions
- The use of different form controls (shown in previous slide)
- e.g. Radioboxes for genders implies either M or F
- e.g. Dropdown menu implies a restriction on some default choices
- Validations with HTML5 (shown in previous slide)
- The first built-in support of client-side validations by IE 10+, Firefox 4+, Chrome, etc
- e.g. Email, URL, Search, and Custom fields
- Validations with Javascript (to be discussed in next slide)
- The programmatic way to customize input patterns
- Well-supported across browsers
Form Validations with Javascript (1/4)
- Recall the best practice: Graceful Degradation
(p.5 in Lect 2)
- if (HTML5 supported) use the native HTML5 Validation
- else if (JS supported) use the JS validation code
- else the form still works without any validations
- HTML5 Mode:
Note: POST Parameters can be accessed only by server but not JS. Hence, nothing is shown here after submission. Firebug can show what was already sent.
- Legacy Mode:
Note: Need some free old-school IE browsers/saucelabs for compatibility tests!?
Form Validations with Javascript (2/4)
The implementation:
- 1. Given a form that has a HTML5 Email field,
<form id="loginForm" method="POST">
  Email: <input type="email" name="em" /><br/>
  Password: <input type="password" name="pw" /><br/>
  <input type="submit" value="Login" />
</form>
Note: Unsupported type will fallback to an ordinary textfield
- 2. Add the title, HTML5 requried and pattern attributes
<form id="loginForm" method="POST">
  Email: <input type="email" name="em" title="valid email" required
                pattern="^[\w=+\-\/][\w=\'+\-\/\.]*@[\w\-]+(\.[\w\-]+)*(\.[\w]{2,6})$" /><br/>
  Password: <input type="password" name="pw" title="valid password" required/><br/>
  <input type="submit" value="Login" />
</form>
Note: Unsupported attributes will be ignored in legacy browsers
Form Validations with Javascript (3/4)
3. To validate the form right before form submission:
<form id="loginForm" method="POST">...</form>
<script type="text/javascript">
var loginForm = document.getElementById('loginForm');
// Do this only if the HTML5 Form Validation is absent
if (!loginForm.checkValidity || loginForm.noValidate)
  // to listen on the submit event of "loginForm"
  loginForm.onsubmit = function(){
    // a private function for displayError
    function displayErr(el,msg){alert('FieldError: ' + msg);el.focus();return false}
    // looping over the array of elements contained in the form
    for (var i = 0, p, el, els = this.elements; el = els[i]; i++) {
      // validate empty field if required attribute is present
      if (el.hasAttribute('required') && el.value == '')
        return displayErr(el, el.title + ' is required');
      // validate pattern if pattern attribute is present
      if ((p = el.getAttribute('pattern')) && !new RegExp(p).test(el.value))
        return displayErr(el, 'in' + el.title);
    }
  // If false is returned above, the form submission will be canceled;
  // If false is NOT returned, the form will submit accordingly
  }
</script>
Form Validations with Javascript (4/4)
- (Take-home) To also validate
radioandcheckboxfor (var i = 0, p, el, els = this.elements; el = els[i]; i++) { // validate empty field, radio and checkboxes if (el.hasAttribute('required')) { if (el.type == 'radio') { if (lastEl && lastEl == el.name) continue; for (var j = 0, chk = false, lastEl = el.name, choices = this[lastEl], choice; choice = choices[j]; j++) if (choice.checked) {chk = true; break;} if (!chk) return displayErr(el, 'choose a ' + el.title); continue; } else if ((el.type == 'checkbox' && !el.checked) || el.value == '') return displayErr(el, el.title + ' is required'); } if ((p = el.getAttribute('pattern')) && !new RegExp(p).test(el.value)) return displayErr(el, 'in' + el.title); }Code Demo. For your exercise/midterm/final, how to skip disabled/hidden controls??
Form Submission Approaches
Form Submission Approaches
- Traditional Form Submission
(demonstrated in previous slide)
- Triggered by a submit button or the Enter key
- Fires the
submitevent, where one can register a listener throughaddEventListener('submit')oronsubmitvalidate before a form submission
- Programmatic Form Submission
- Recommended to use this only when submiting a form automatically
<form method="POST" id="buildAutoPostReq"><!-- Some hidden fields here --></form>
<script type="text/javascript">document.forms[0].submit();</script>
- Unfortunately, programmers (incl. HSBC) who don't know
<input type="image">like to do this for images: When an image is clicked,Form.submit()will be finally called if a form is properly validated - Notice: NO
submitevent is fired.
- Recommended to use this only when submiting a form automatically
- AJAX Form Submission (implementation to be detailed next week)
- Asynchronous Javascript and XML
- In terms of implementation, it's ultimately the
XMLHttpRequestAPI, but better wrap it with a library :) - The concept on async is much more important
Synchronous Workflow
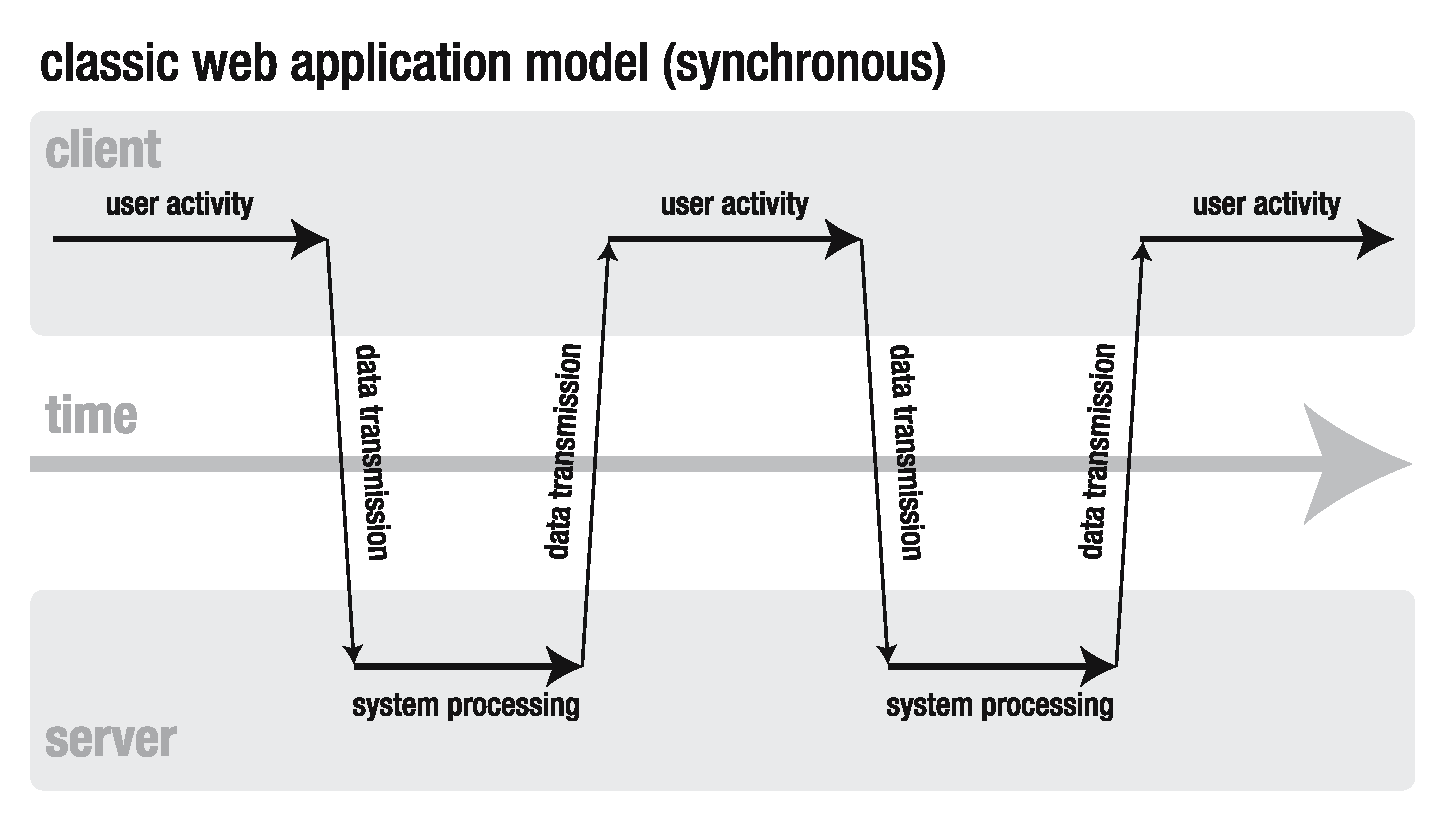
Synchronous calls are blocking. It hangs until the server returns, and could also block later requests, i.e. less efficient
Image Source: John Resig, Pro Javascript Techniques, p.26, 2007
Asynchronous Workflow
Principle: Do something else while waiting
Dispatch many requests at a time. Do something else. Get notified when server returns, then render the results. The responses will likely be out of order.
Image Source: https://www.ibm.com/developerworks/websphere/library/techarticles/0611_lucas/images/fig1.jpg
Video Source: https://www.youtube.com/embed/cBVoNJ_IGV0 (start watching at 1m38s)
Video Source: https://www.youtube.com/embed/cBVoNJ_IGV0 (start watching at 1m38s)
Introduction to AJAX
- Asynchonous
XMLHttpRequestAPI- Sends a request asynchronously at background; does not block other processing
- Modern user experience
- Load the delta but not the whole page. Eliminate page-load effect, i.e. blank screen
- Simple Implementation
var xhr = window.XMLHttpRequest
		? new XMLHttpRequest()                     // IE7+, Firefox1+, Chrome1+, etc
		: new ActiveXObject("Microsoft.XMLHTTP");  // IE 6

xhr.open('GET', 'deltaPage.html', true);           // async = true as 3rd param
// register a callback function to listen to readystatechange
xhr.onreadystatechange = function(){
    if (xhr.readyState === 4 && xhr.status === 200) {
        alert(xhr.responseText);
    }
};
xhr.send(null);
/* ... do something else */
AJAX Form Submission
- Demonstration
-
- (1) Listen to
submitevent - (2) Cancel the default form submission
- (3) Craft a POST request to send over AJAX
- (4) On feedback received, echo the feedback
- (1) Listen to
- (Demo) Sniff the request generated. Same as Slide #6.
- File uploads over AJAX not covered, but will be needed in phase 3.
You may check Using files from web applications for reference.
AJAX Form Submission: Implementation (1/4)
- (1) Listen to the
submiteventdocument.getElementById('loginForm').addEventListener('submit', function(e){ /* complete step (2), (3), (4) */ }, false);Can we listen to the click event of submit button instead? What're the pros/cons?
- (2) Cancel the default form submission
document.getElementById('loginForm').addEventListener('submit', function(e){
    // Always cancel the default submission
    e.preventDefault();
    /* complete step (3), (4) */
}, false);
AJAX Form Submission: Implementation (2/4)
- (3) Craft a POST request to send over AJAX - (a) Serialize Parameters
function serializeFormData(form) {
  return [].map.call(form.elements, function(el) {
    if (el.name && !el.disabled)
      return [el.name, el.value].map(encodeURIComponent).join('=');
    return '';
  }).join('&');
};
Advanced Version that takes care of multi-valued elements:if (el.name && !el.disabled && (!el.type || el.type.toLowerCase() !== 'checkbox' || el.checked)) { if (el.tagName === 'SELECT' && el.hasAttribute('multiple')) return [].map.call(el.selectedOptions, function(o) { return [el.name, o.value].map(encodeURIComponent).join('='); }).join('&'); return [el.name, el.value].map(encodeURIComponent).join('='); }
Ref: Array.prototype.map(), encodeURIComponent, HTML Input Element API, HTML Textarea Element API, and HTML Select Element API
AJAX Form Submission: Implementation (3/4)
- (3) Craft a POST request to send over AJAX - (b) AJAX POST Request
document.getElementById('loginForm').addEventListener('submit', function(e){
  e.preventDefault();
  var xhr = new XMLHttpRequest(), method = this.getAttribute('method');
  xhr.open(method, this.getAttribute('action'), true);

  // config the default request header as required by POST
  if (method.toLowerCase() === 'post')
    xhr.setRequestHeader("Content-type", "application/x-www-form-urlencoded");

  xhr.onreadystatechange = function () {
    if (this.readyState === 4 && this.status === 200)
      /* complete step (4) */
  };

  xhr.send(serializeFormData(this));
}, false);
AJAX Form Submission: Implementation (4/4)
- (4) On feedback received, echo the feedback
document.getElementById('loginForm').addEventListener('submit', function(e){ e.preventDefault(); var xhr = new XMLHttpRequest(), method = this.getAttribute('method'); xhr.open(method, this.getAttribute('action'), true); if (method.toLowerCase() === 'post') xhr.setRequestHeader("Content-type", "application/x-www-form-urlencoded"); xhr.onreadystatechange = function () { if (this.readyState === 4 && this.status === 200) var resp = this.responseText; document.getElementById('result').innerHTML = resp.replace(/</g, '<'); }; xhr.send(serializeFormData(this)); }, false); - In practice, we often use a library like superagent or jquery to make AJAX calls
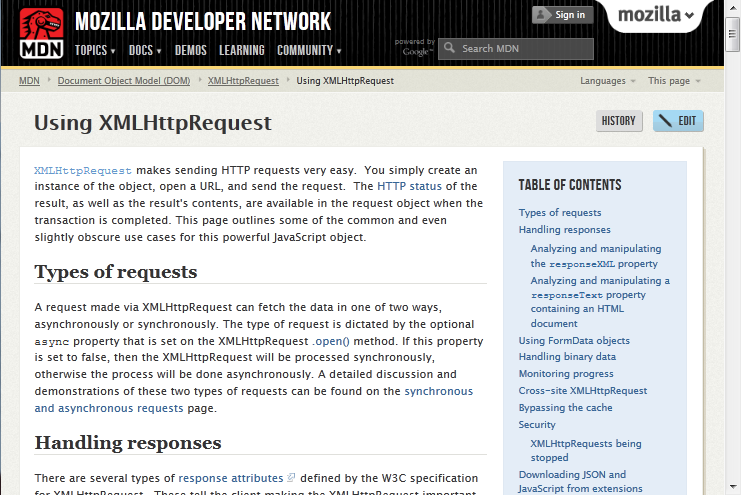
XMLHttpRequest
Some Logistics...
- Interactive Workshop next week
- Will spare 30-45min for environment setup and coding
- Some demos, then teaching teams walking around to help
- Come with your laptop (sufficiently charged)
- Hint: setting up Node.js
- Credit Card needed for AWS registrations. Follow Tutorial 3.